
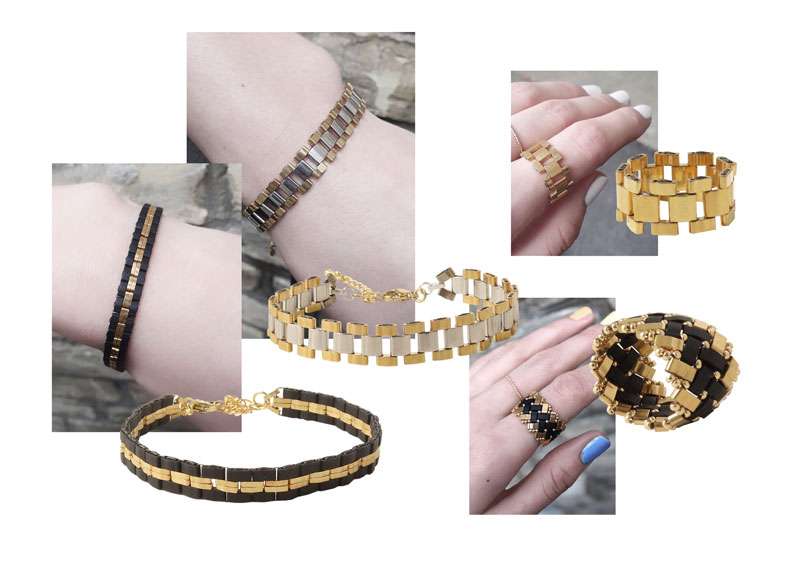
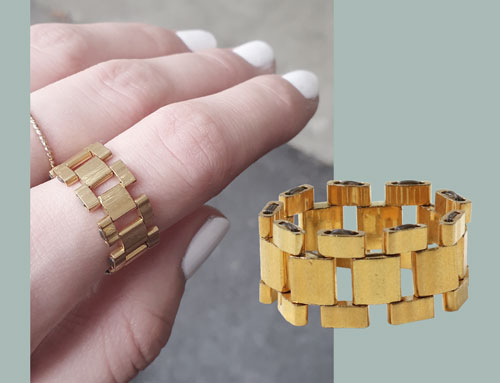
In this DIY blog post from Smyks.com, we show you how to make a series of stylish bracelets and finger rings with the beautiful Miyuki Tila beads.
Tila beads from Japanese Miyuki are flat square beads with two parallel holes, which makes them suitable for certain types of beadwork. Tila beads, like other seed beads, are available in many colors and in three different sizes, whole tila, which is square, half tila, and quarter tila, which is the smallest. All three sizes have the same width, so they can always be matched with each other. The many different colors and formats allow you to create beautiful mosaic-like patterns in a myriad of designs, whether they are mounted with beading thread or elastic cord for jewlery. Whether you like the variegated ethnic jewelry look or the simple Nordic style, you can find beads to suit your taste.
It should be noted that as with other seed beads, the metallic beads, such as gold, often have limited wear resistance, which is why we recommend brushing with jewelry lacquer coating or clear nail polish on exposed areas before use.
See also the related blog post: Bracelets with square tila beads here.
Smyks has got a wide range of colours in stock: Miyuki Tila beads
Besides, we offer two different jewellery kits for beginners which contains all the materials you need to make your first DIY bracelets with Tila beads.
 |
") |
Bracelet with leather edge and Tila beads
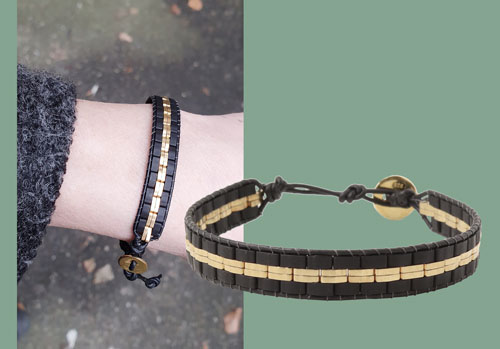
This woven bracelet features a leather edge and a button hole. Click here to read the step-by-step instructions in the blog post on DIY Bracelets with square Tila beads.
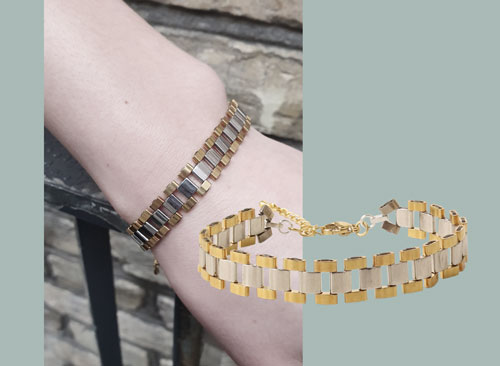
Bracelet with 2 rows of Tila beads
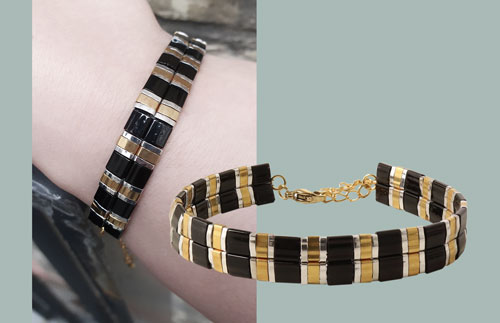
You will find the step-by-step instruction for this two-rowed bracelet at the end of this blog post.
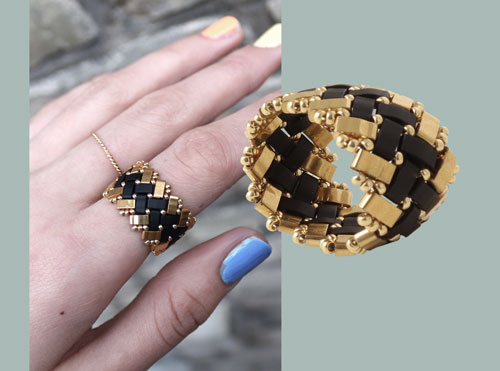
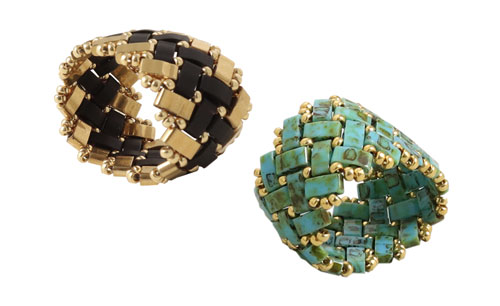
Ring with 24 carat gold-plated Tila beads
We used the following materials to make this ring:
- Miyuki half Tila beads, 24ct gold-plated
- Miyuki Tila beads, 24ct gold-plated
- 2m FireLine 6LB, black
- beading needle
- scissors
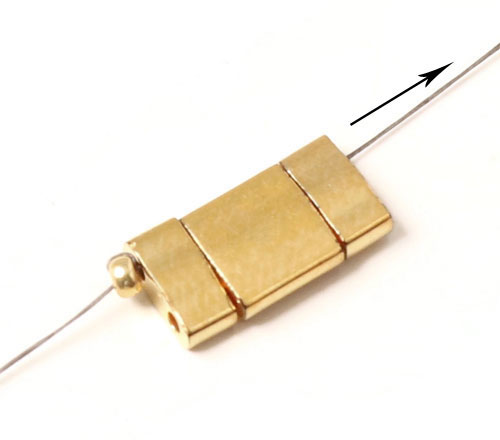
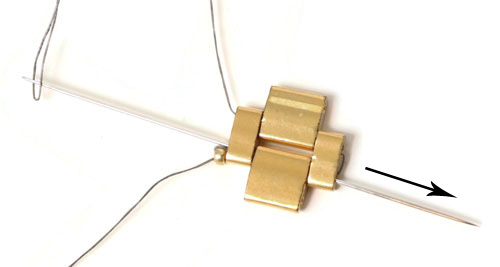
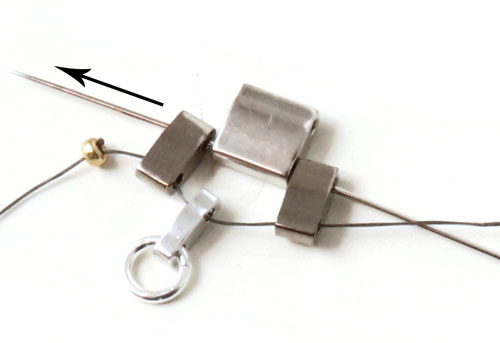
First, you take a bead and sew through it twice in order to make it your stopper bead. Leave a thread end of approx. 15cm length.
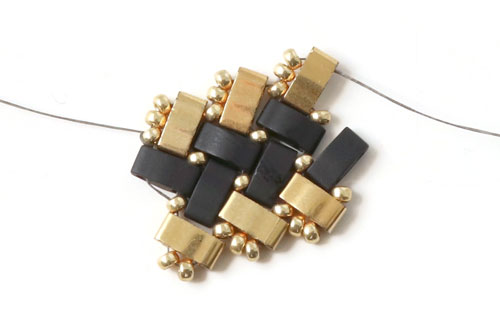
Then you thread 3 Tila beads as shown in the picture.
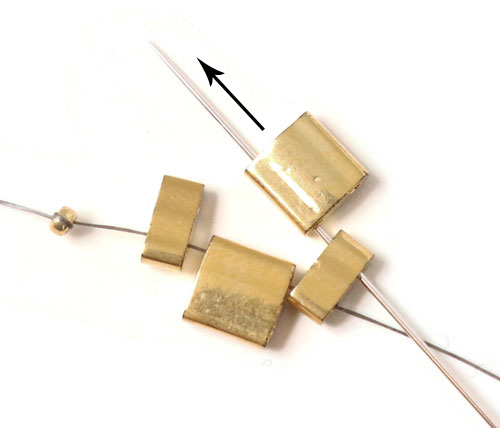
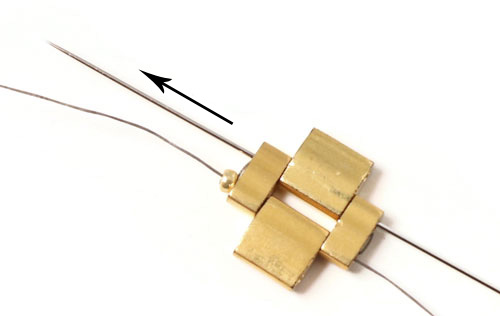
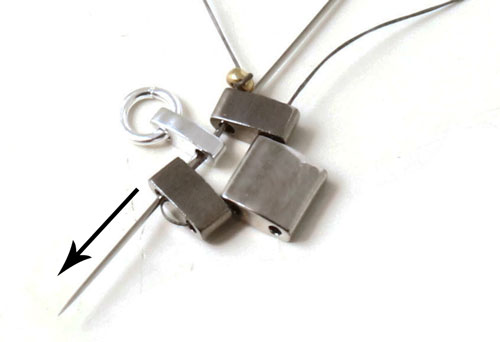
Sew through the other hole of the last bead and thread a square Tila bead.
... continue through the other hole of the first bead.
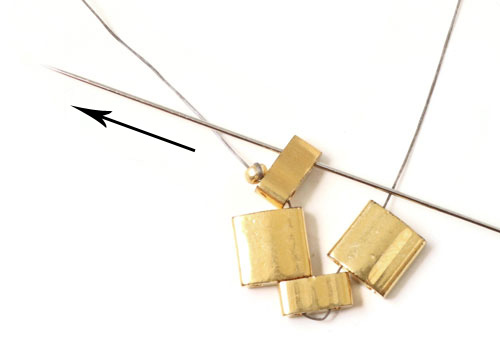
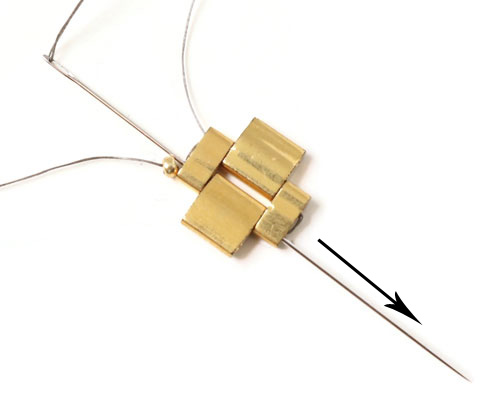
Tighten the thread. The first circle is done. Now you sew through the first 3 beads one more time...
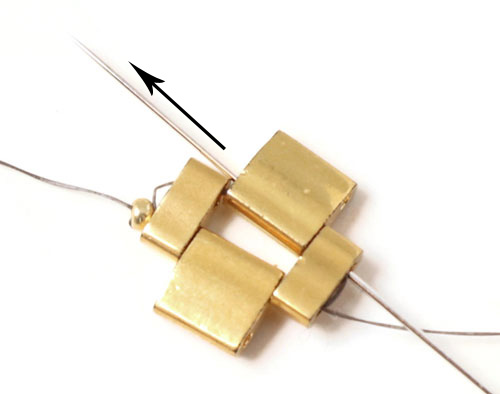
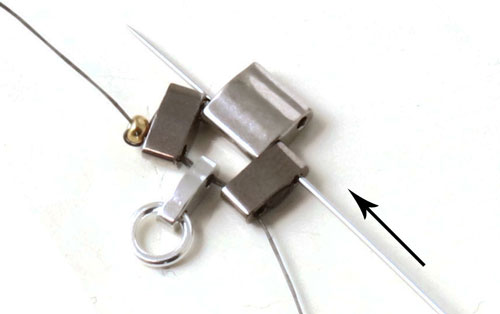
... and backwards through 3 beads...
...and one more round through the first 3 beads. It is actually not necessary to sew this extra round, but it makes your piece of jewellery firmer.
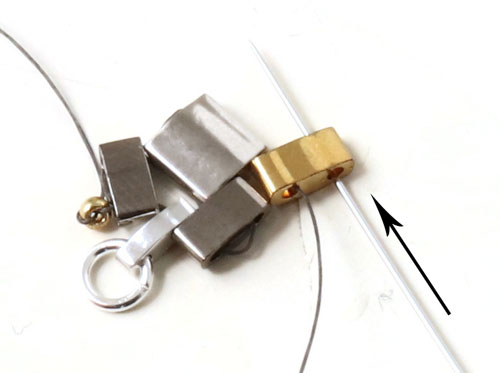
Now you sew through 2 beads (the half Tila bead + the square one)...
Picture 1

... and backwards through the other hole of the square one.
After that, you thread a half Tila bead...
... sew backwards through the other hole of the same half Tila bead ... and thread a square Tila bead.
.Then you thread a half Tila bead.
In order to make the next circle, you sew into the other direction through 3 beads.
.
... continue through 3 beads...
... and through 3 beads into the other direction...
... through 2 beads...
... back through the other hole of the square Tila bead.
Continue in the same way, incorporating beads in circles (picture 1).
When the ring has reached the desired length, you thread a half Tila bead ... and sew back through the other hole of the same half bead.
Now you sew through the first square Tila in order to connect the two ends of the ring.
Thread a half Tila bead...

... sew back through the same half Tila ... and continue through the next 2 beads.
Now the ring is put together. Remove the stopper bead and fasten the thread ends by sewing them up neatly. Make sure that the thread is always hidden.
Cut the excess thread.
Now your ring is done.
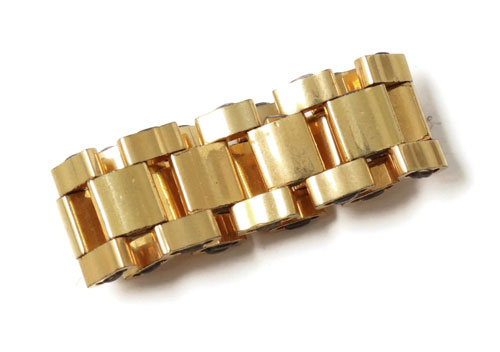
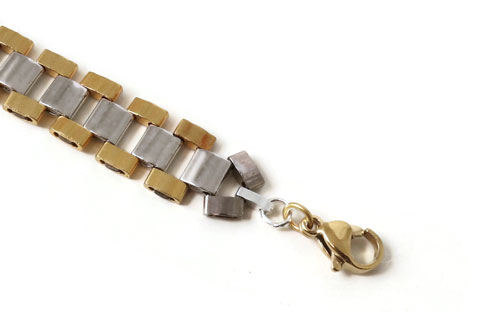
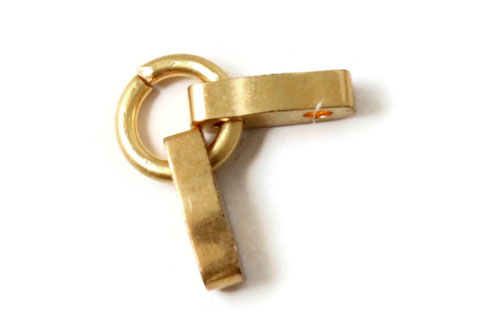
Bracelet with Tila bead links
We used the following materials to make this bracelet:
- Miyuki half Tila beads, 24ct gold-plated
- Miyuki Tila beads, glossy dark metal
- 4 Miyuki half Tila beads, glossy dark metal
- 2 Miyuki quarter Tila beads, silver-coloured
- 2 jumprings, 4mm, silver-plated
- 2 jumprings, 4mm, gold-plated brass
- 1 lobster claw clasp, 10mm, gold-plated brass
- 1 chain extender, gold-plated brass
- approx. 2m FireLine 6LB, black
- beading needle
- scissors

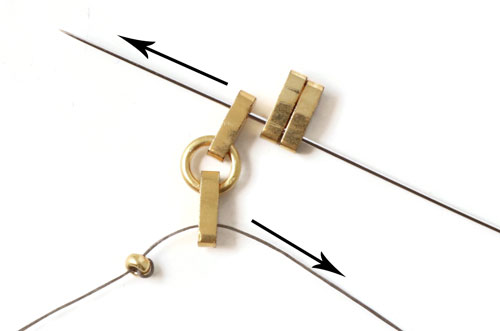
First, you set a 4mm silver-plated jumpring into a quarter Tila bead.
Next, you sew twice through a bead in order to make it your stopper bead leaving a thread end of approx. 20cm length. After that, you thread the first 3 beads in the order shown above ( 1 half Tila bead - 1 quarter bead with jumpring - 1 half bead). Sew back the the other hole of the last bead.
Thread a square bead and continue through the other hole of the first half bead.
Now you sew through 3 beads as shown in the picture.
Sew through 2 beads as shown in the picture. Now the needle comes out of the square Tila bead.
Picture 1

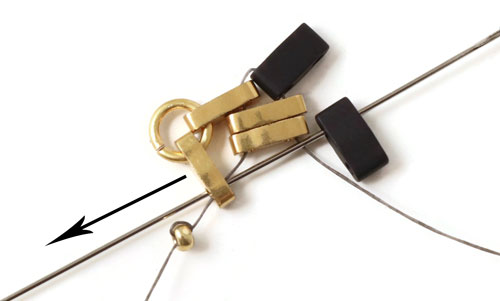
Now you start assembling the bracelet links. Sew back through the other hole of the square Tila and thread a gold-plated half Tila.
Sew back through the other hole of the golden bead.
Thread a square bead and a gold-plated half bead.

In order to fasten the last 2 beads, sew back through 3 beads as shown in the picture. Remember to tighten the tread.
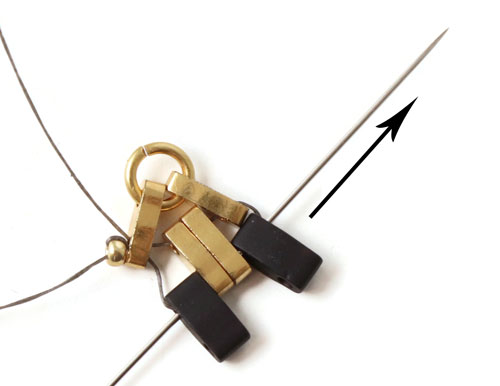
Sew an extra round in order to make your bracelet firm...
.jpg)
... and one more round.
The bracelet links are arranged in a circle. Now you are going to make the next circle: Thread 2 beads as shown in the picture.
Sew back again through the square Tila bead. Continue in this way incorporating beads in circles (starting from picture 1).
Once the bracelet has reached the desired lenth, you finish it as you started it, i.e., with 2 half beads and a quarter bead with a silver-plated jumpring attached.
Remove the stopper bead and fasten the thread ends by sewing them up. Now you attach the clasp using a 4mm gold-plated jumpring.
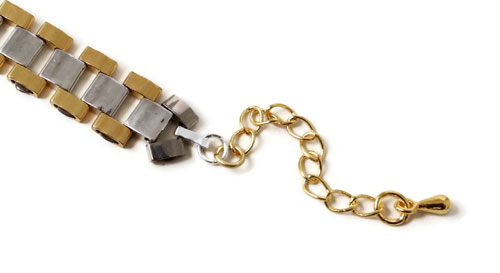
After that, you fasten the chain extender at the other end with the other 4mm gold-plated jumpring.
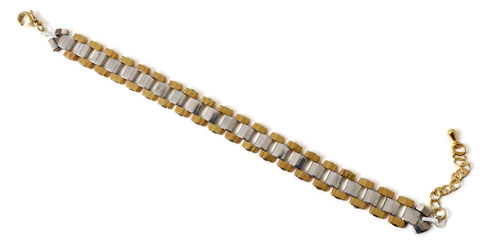
Now your bracelet with Tila bead links is done.
Bracelet with quarter Tila beads
We used the following materials to make this bracelet:
- Miyuki quarter Tila beads, 24ct gold-plated
- Miyuki half Tila beads, matte black
- 4 jumprings, 0.4mm, gold-plated brass
- 1 lobster claw clasp, 10mm, gold-plated brass
- 1 chain extender, gold-plated brass
- 2m FireLine 6LB, black (8LB can be used as well)
- beading needle
- scissors
First, you open a 4mm jumpring, insert 2 quarter Tila beads and close the jumpring again.
Fasten a stopper bead by sewing through it twice and leave a thread end of approx. 15c length.
Sew through 1 of the Tila beads as shown in the picture ... thread 2 new quarter Tilas ... and sew through the second bead on the jumpring.

Arrange the beads as shown above ... thread a black half bead ... and sew the the 2 Tila beads in the middle.
Tighten the tread ... thread another black half Tila ... and sew through the first Tila bead.
Then you sew back through 4 beads (1 black half bead - 2 golden quarter beads - 1 black half bead).
Sew back through the black bead ... thread 2 golden quarter beads...
... and continue through the other black Tila.
Picture 1
Tighten the thread. Then you thread a black bead ... sew through the 2 golden ones ... and thread another black bead.
Sew back through the black Tila bead ... thread 2 golden beads ... and continue through the black bead.
For this example we sew an extra round through the 4 beads to make the bracelet firmer.
... and back again through 4 beads. (This is not necessary if the bracelet is already firm enough.)
After that, you thread 1 black bead ... sew through the 2 golden beads ... and thread one more black bead. Continue in this way (starting from picture 1) until the bracelet has reached the desired length.
You finish the bracelet with 2 gold-plated quarter Tila beads in a jumpring. Finally, you attach the clasp with a 4mm jumpring at the one end ...

... and the chain extender with the last 4mm jumping at the other end.
Ring with half Tila beads in black and gold
We used the following materials to make this ring:
- Miyuki half Tila beads, 24ct gold-plated
- Miyuki half Tila beads, matte black
- Miyuki seed beads size #15 24 carat
- approx. 1m FireLine 6LB, black
- beading needle
- scissors
The instructions on how to make these DIY rings with half Tila beads are only available in Danish and German.
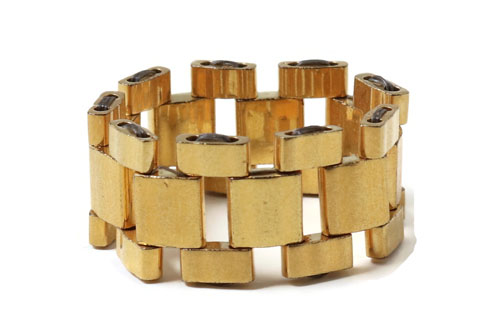
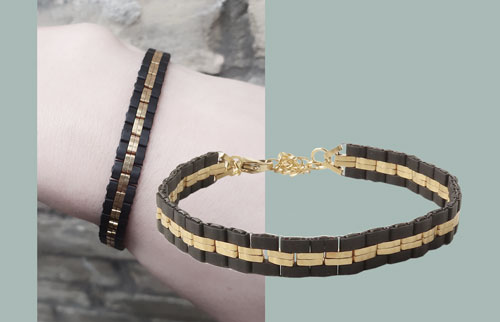
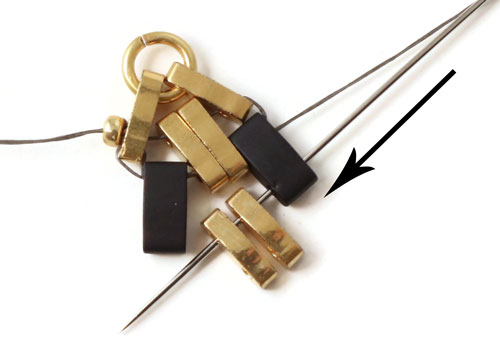
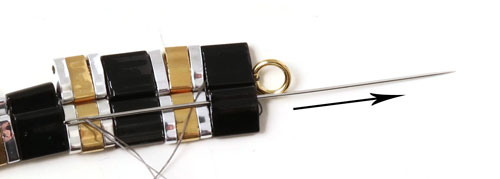
Bracelet with 2 rows of Tila beads
We used the following materials to make this two-rowed bracelet:
- Miyuki Tila beads, shiny black
- Miyuki half Tila beads, 24ct gold-plated
- Miyuki quarter Tila beads, silver-coloured
- approx. 2m FireLine 6LB, black
- 2 closed jumprings, 0.4mm, gold-plated sterling silver
- 2 open jumprings, 0.4mm, gold-plated sterling silver
- 1 lobster claw clasp, 9mm, gold-plated sterling silver
- 1 chain extender
- beading needle
- scissors
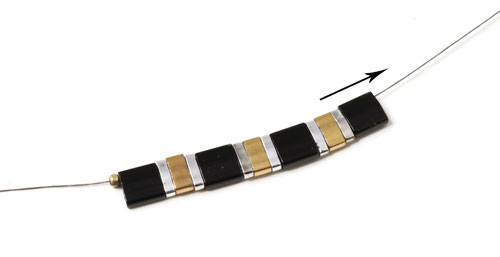
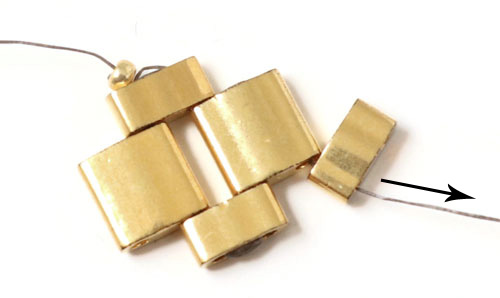
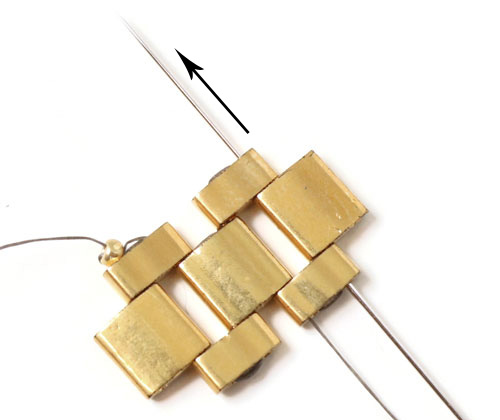
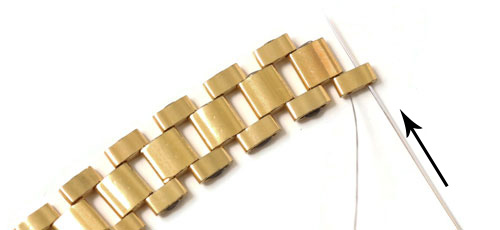
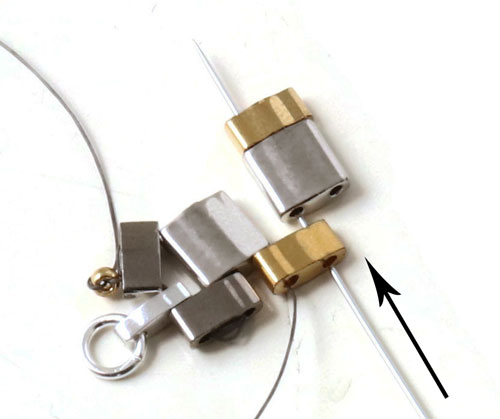
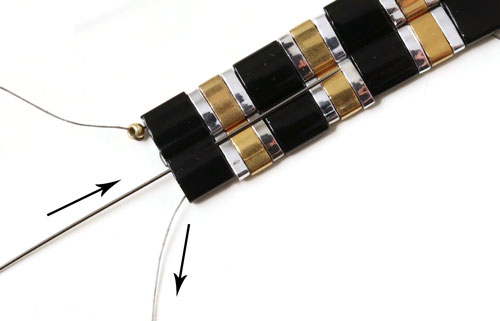
First, you take a bead and sew through it twice in order to make it your stopper bead. Leave a thread end of approx. 15cm length.
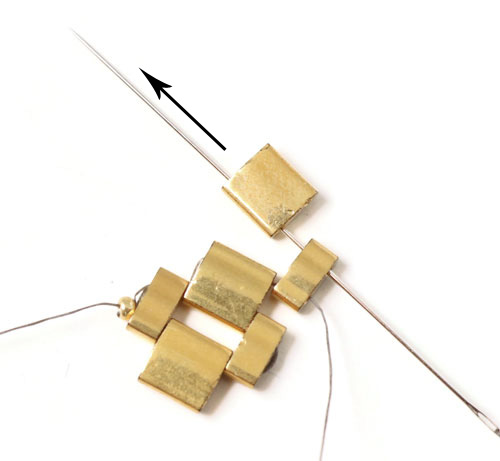
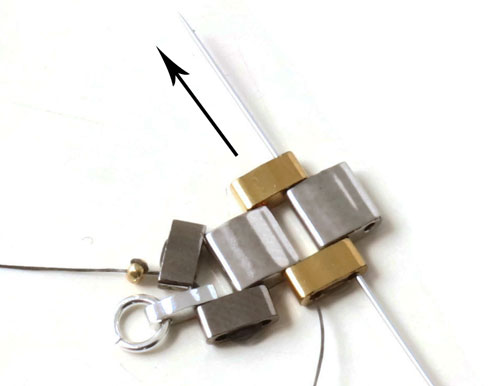
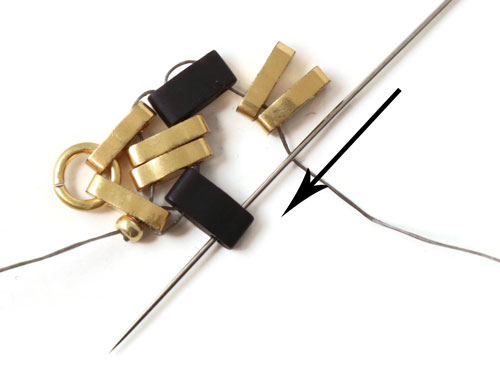
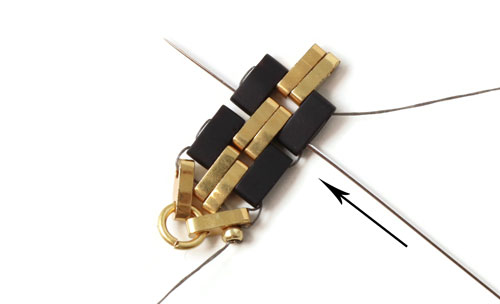
Then you thread all beads in the order shown in the picture.

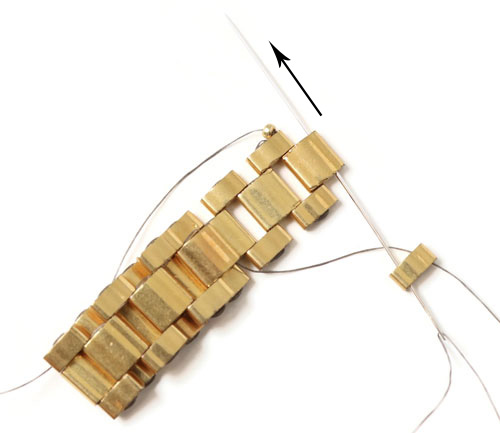
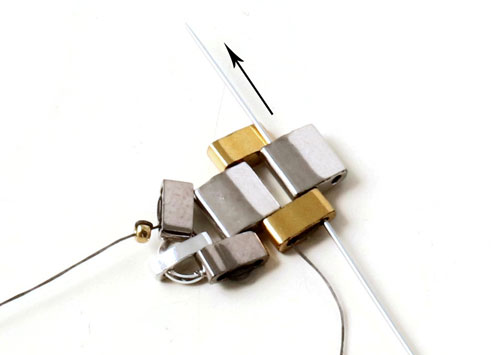
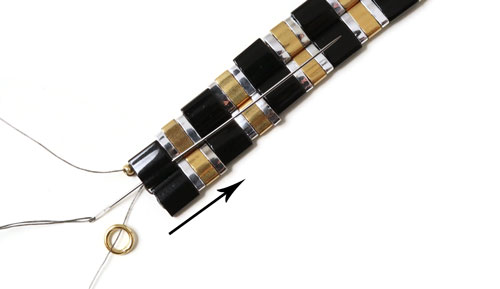
Continue until the bracelet has reached the desired length.
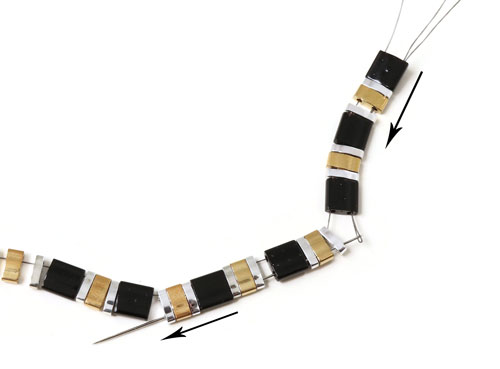
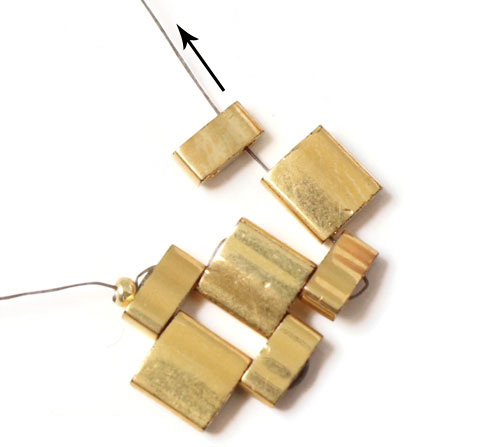
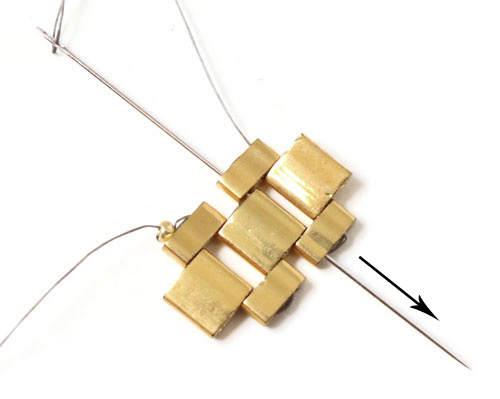
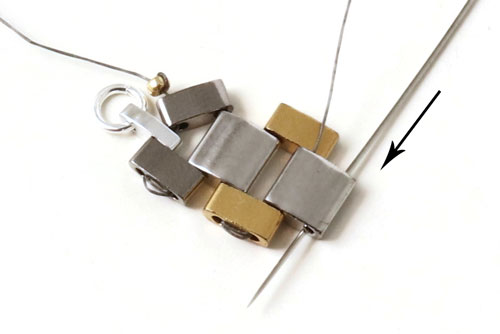
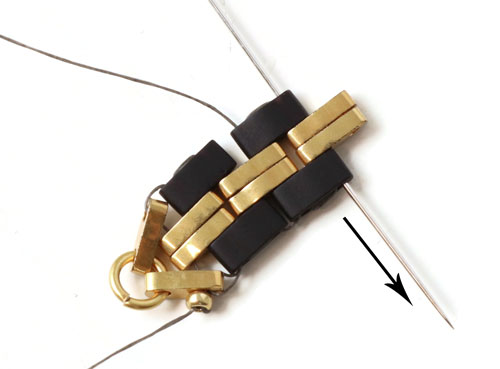
After that, you sew backwards through all the beads through their other hole.
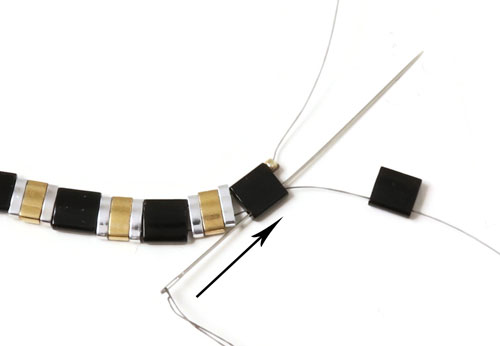
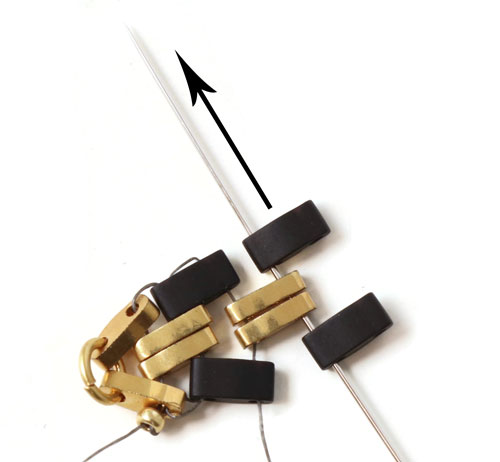
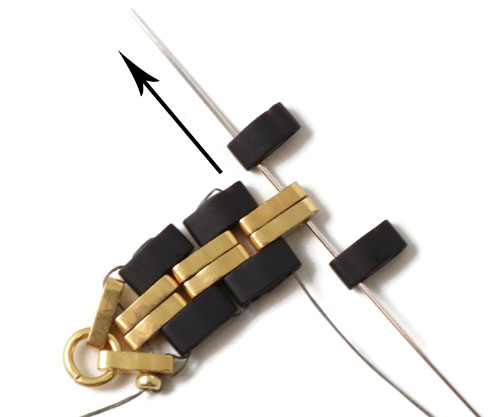
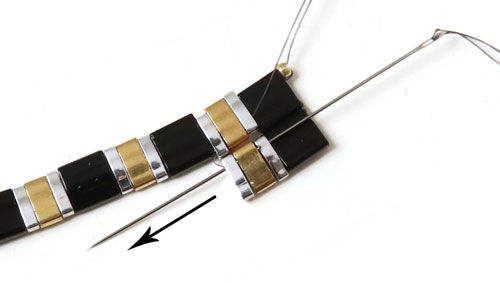
Now you start making the second row. Thread a black bead and sew through the first black bead one more time as shown in the picture. Tighten the thread. You incorporate the second row by sewing in circles.
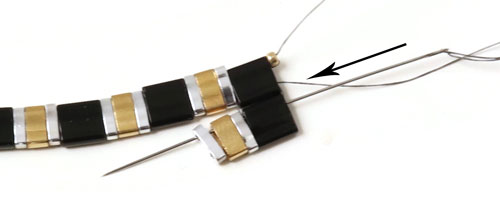
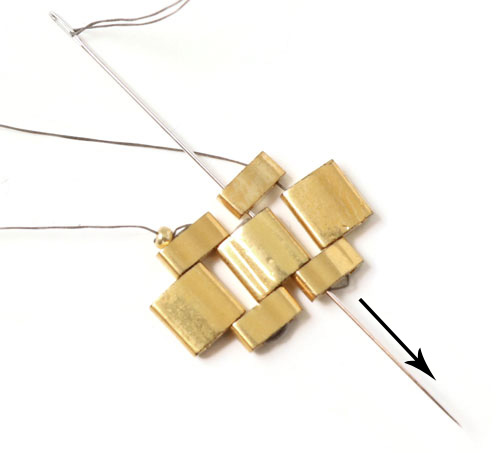
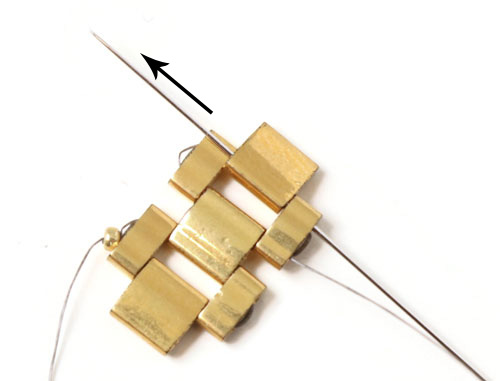
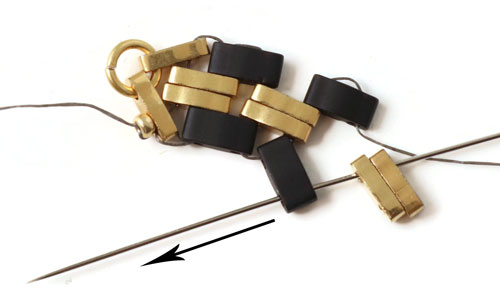
Sew back through the black bead in the second row and thread 3 more beads (1 silver + 1 gold + 1 silver).
To fasten these 3 beads, you sew back through the respective beads in the first row...
... and again through the 3 beads in the second row.

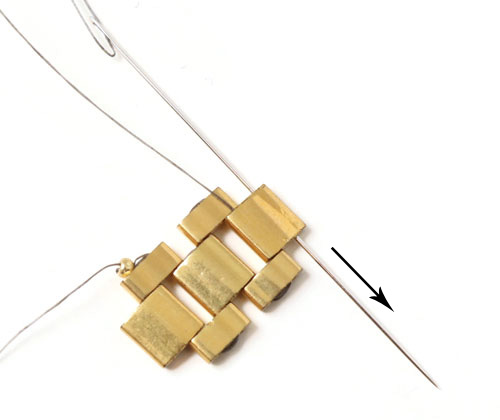
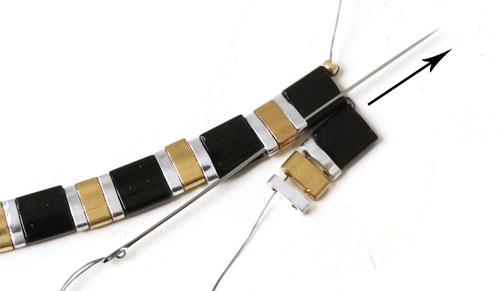
Thread a black bead ...
... backwards through the black bead in the first row...
... and forwards again through the black bead in the second row. Continue incorporating the second row of beads in this way, i.e., sewing in circles.
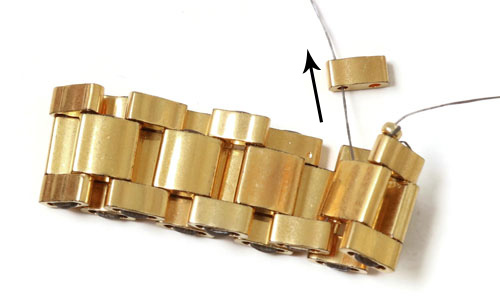
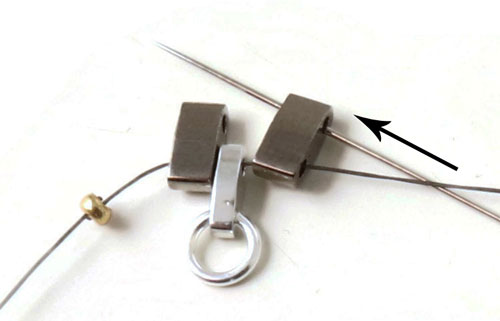
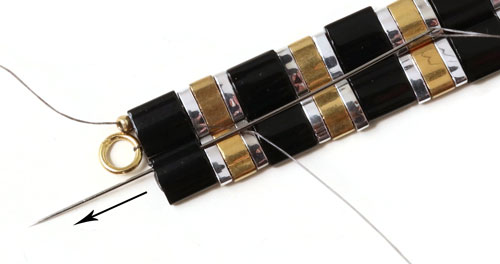
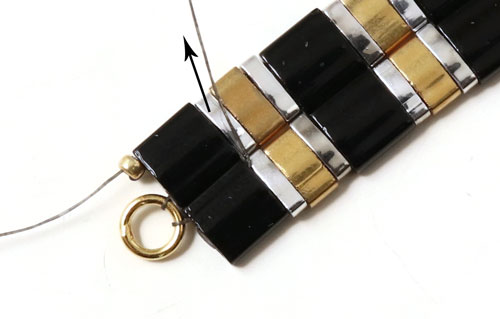
When the last bead of the second row is fastened, you sew through the closed jumpring ... back through the same bead...
... up through the black bead next to it...
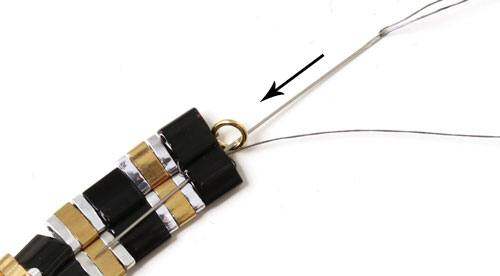
... one more time through the ring and back through the black bead. Now the jumpring is attached to the end of the bracelet.
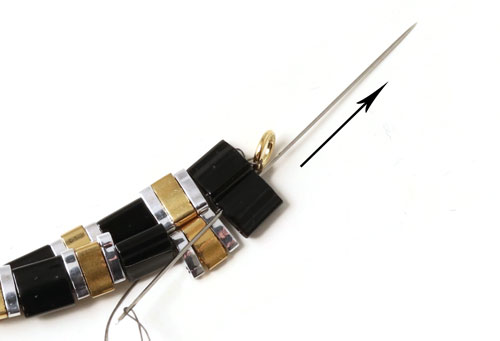
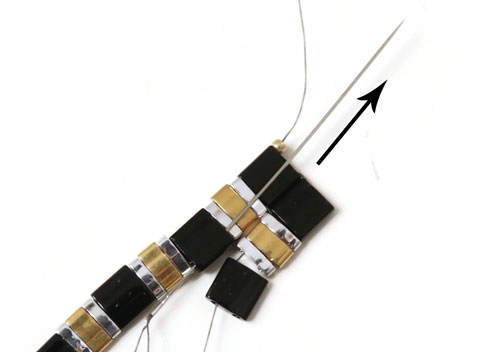
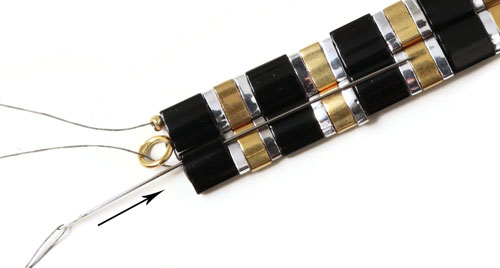
Turn the bracelet ... and sew up through the black bead in the second row.
Continue sewing through all the beads in the second row.
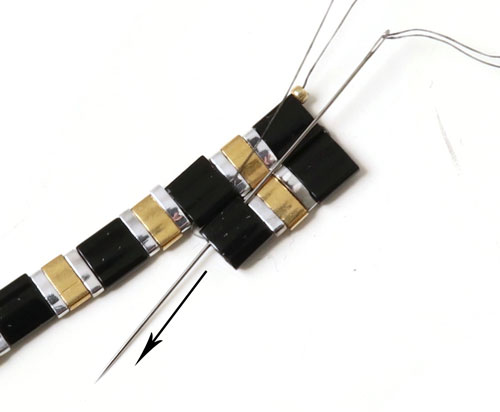
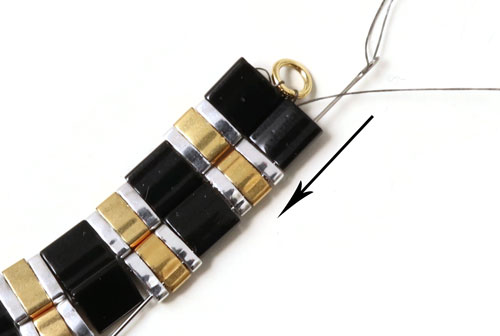
When the thread comes out of the last bead, you sew backwards through the last black bead...
.jpg)
... and up through the other black bead. Now you can fasten a closed jumpring to this end of the bracelet.
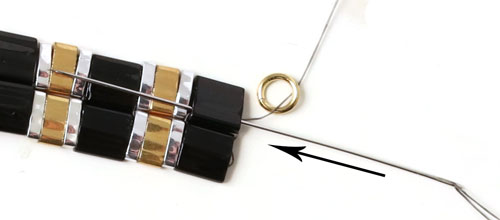
You attach it in the same way as you did the first: Sew through the ring ... back through the bead ...
.. up through the other black bead ...
... through the ring again ... and back through the black bead.
Tighten the thread. You fasten the thread by sewing it up neatly before you cut it off. Remove the stopper bead and fasten the second thread end in in the same way.
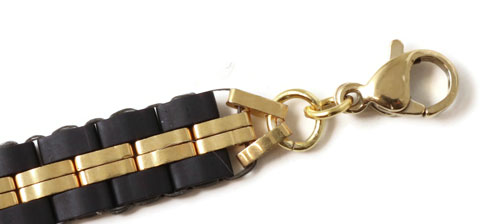
Finally, you attach the lobster claw clasp at one end with the help of an open jumpring and the chain extender at the other end using the other open jumpring.
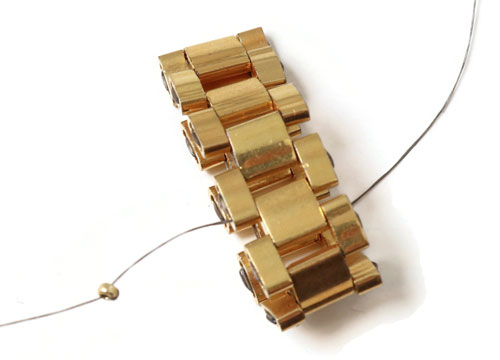
Your two-rowed bracelet with Tila beads is done!
Response
We will publicly show your name and comment on this website. Your email is to ensure that the author of this post can get back to you. We promise to keep your data safe and secure.